Monday 27 January 2020

Contractor Staten Island

Home renovation Staten Island
2013 was a productive and exciting year around my house staten island home renovation!
I had a blast working on the house and making it my home! In fact, SO MUCH HAPPENED or changed I can’t even fit a summary of it all into one post without exhausting myself or crashing the blog. Crazy! I tried but gave up. Not sure how I did all these posts and projects at my house, but somehow it all was completed or revealed in 2013 Staten Island home renovation. SOOOOOOOOOO….let’s just reviewing a few rooms or areas at a time with a quick summary and you can explore all the related links at your leisure, shall we?
First off, we’ll wrap up posts from the kitchen; entry and backyard in bite sized chunks. Then I’ll come back to catch up with some more updates, makeovers and projects from around other rooms in my house, plus I have about a million other things to catch you up on. You’ll find PART TWO here!
If you are new or have been away for the holidays, you may enjoy starting with this recently posted tale of my {imperfect} journey toward a dream home, complete with an honest look at the struggles along the way staten island home renovation!
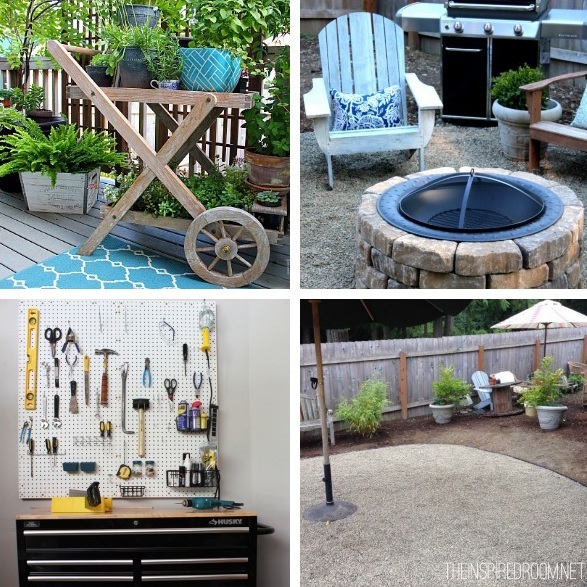
Below are the highlights of my favorite projects and updates to my kitchen, entry/hall and backyard in 2013, with a few crafty moments thrown in Contractor Staten Island home renovation?

Monday 20 January 2020

Contractor Staten Island


So, you’re ready to take the big plunge into home ownership. You’ve made a thorough checklist of the most important factors to review with your real estate agent:
  • ·         Location
  • ·         Property Size
  • ·         Number of preferred bedrooms and bathrooms
  • ·         Important upgrades

You think you have come up with every possible question to ask… You’ve found your dream home… the stars have aligned and a few short months later, you’re pulling the moving truck into your very own driveway. But over the course of the next few weeks, you start to notice things about your new home that you hadn’t even considered before… little things that bother you; minor inconveniences… and maybe even some big issues. The following is a list of three important factors to consider when buying a house that you might not even think of before you sign on the dotted line.

Old Victorians, fixer-uppers… they might look beautiful and sound like a fun project to take on, but in reality they could pose as a potential health risk. Any house built before 1978 may contain significant amounts of lead-based paint, both interior and exterior. Lead-based paint was banned from use in homes after 1978 due to its health risks. Federal law requires sellers to disclose any known information about houses that contain lead-based paint as well as information on its dangers. Still, so many people overlook this information; thinking it does not pose as a significant risk since they’re not ingesting the paint.

However, paint that’s chipping or areas that maintain a lot of friction, such as doorways and window sills, create lead dust that you can breathe in Contractor Staten Island. Not to mention, pets and children can ingest the dust if they are walking or crawling on the floor or putting things in their mouths that lead dust has landed on. Of the many negative health effects lead has on humans, it most significantly affects infants and small children’s neurological development. The effects are irreversible; therefore, it is important to eliminate as much exposure to it as possible.

If you do fall in love with a house that contains lead-based paint, there are ways you can manage it. It is important to note that you should not try to remove or cover lead-based paint with other paint yourself Contractor Staten Island, as you might disrupt the paint and create unhealthy dust and debris. The only way to safely and permanently eliminate lead-based paint in your home is to hire a certified professional to perform a thorough inspection, risk assessment and abatement of the lead-based paint.

Sunday 12 January 2020

Contractor Staten Island NY

We introduce ourselves as experienced and professional Contractors at Staten Island. Platinum Renovation Services is the premier organisation which gives the quality services at the most affordable rates.  


Platinum Renovation Services provides a wide range of projects, starting from the custom homes and buildings, commercial and residential renovations up to new constructions. It is significant to note that there can hardly be any kind of project in the construction or renovation realm which we have not been able to execute with perfection. 

Moreover, everything has been achieved by vigilant supervision at the sight all through step by step until the completion of the project. That is why Platinum Renovation Services is a pioneer in the business for more than 30 years. It is our regular practice. We keep a sharp eye to ensure an accurate layout, perfect scheduling, and synchronized coordination of all job-site activities.


Platinum Renovation Services
92 Pemberton Ave, Staten Island, New York
718-869-4526
http://sihomerenovations.com/

Friday 3 January 2020

Best Contractor in Staten Island


Staten Island contractor and hold onto your safety goggles, its 2,000 words long. But don’t let all the words fool you; we’d say that this was one of the biggest bang-for-you-buck / most fool-proof ways to make an easy upgrade that we’ve encountered in a while. Wow, just realized I’m five sentences into this and I’ve already said “bang” twice. Not sure if that’s a good sign Contractor Staten island or what…

We had long known that adding some sort of molding feature to our hallway was in our future… and now we’re just kicking ourselves for waiting so long. It cost us a mere $57 for the materials (we did buy a tool on top of that, but we’ll get to that in a second) and it only took a few hour-or-two-long work periods over the course of 6 days (including some break days for paint-curing) to finally bring some oomph to our boring hall. So anyone who’s looking to tackle this on nights and weekends could hopefully do it within a week since each step only took a few hours and could be spaced out across each evening Contractor Staten island.

We were inspired by a few other tutorials – like Ana’s, Kate’s, Sarah’s, and Emily’s – and took pieces and parts of each to figure out what worked best for us. So our tutorial below may not be exactly what your space needs, but between the lots of us there should be a fitting solution in there! Let’s just say that we learned that there are many different ways that you can approach board & batten, so a lot is about personal preference, what suits your home, etc.

And fret not if you can’t watch the videos (if, say, you’re at work) – we broke down all the steps with photos and descriptions right here (note: watching them later if you’re planning to tackle this might simplify things a lot – I always think videos make things less intimidating).

But on with the words! To start, we measured the space and planned our materials. My graph-paper sketch was probably over killed, but it made me feel better. It helped us plan how many boards we needed for the top rail and ledge, as well as count how many battens (the vertical strips) we might need.
Next up was a supply run. We had most of what we needed on hand, so the only four items that we ended up purchasing are pictured below (the nail gun being a belated birthday gift from my sweet wife who was just waiting for me to pick out the one I wanted).